Product: Fitbit Charge HR
Maker: Fitbit | www.fitbit.com | San Francisco
Price: $128.79 USD
Buy Now: http://amzn.to/2cuD0d0

NOTE: Before you beat me up on my ABYSMALLY low activity for the day, this screen shot was taken shortly after my son was born. So go easy on a new Dad 😉
Summary:
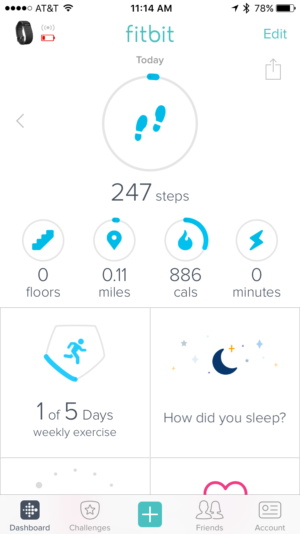
NOTE: Before you beat me up on my ABYSMALLY low activity for the day, this screen shot was taken shortly after my son was born. So go easy on a new Dad 😉
Wearable fitness trackers have come a long way since Nike debuted the Fuel Band in 2012. That being said, I can still remember ordering one from Target the day that they were released! I was really lucky as I managed to get a discount on my purchase. I have always been a big fan of coupons and saving money, so when my friend told me that he could help me to save more money on my next Target purchase by sending me a promo code I was absolutely delighted. I suppose what I am trying to say is that if you are considering purchasing a fitness tracker anytime soon, I would strongly recommend doing some research online first as there might be a discount code that you can use to get the product that you would like at the best possible price. Anyway, the Fitbit Charge HR represents the current evolution of wearable fitness products. If you’re on a tight budget, focus first on the essentials (good running shoes ((Brooks Adrenaline Trail Shoe is Aces)), decent hiking back pack (GoRuck GR2), gym membership or at home gym equipment like a pull-up bar). But if you have all the basics, and are looking to get a bit more scientific about your workouts, the Fitbit Charge HR is a great product to add to your arsenal.
Personally, I have been using the Fitbit Charge HR for over a year now and can personally attest to the benefits that it has brought to my training. With just the click of a button, you can quickly toggle through current time, total daily steps, current heart rate, total daily mileage, calories burned, and total floors climbed. And if you hold the button down twice, you can track specific workouts. Which will generate workout specific data (average heart rate, total distance, total time, etc.) I really like to use this feature for hiking, especially if I’m climbing in unfamiliar terrain. The Charge HR uses air pressure changes to assess elevation gain, and is fairly accurate. For each 10 feet of elevation gained, it calculates that as a floor climbed. So if it says you have climbed 100 floors during a workout, you ascended ~1,000 feet.
There’s also a neat social component built into Fitbit’s product line. You can add friends and challenge them to daily or weekly step contests. Again, it’s a bit of a novelty, but during the off-season, when it’s so easy to just sit on the couch, drink beer and binge on Netflix, any little bit of motivation helps, and competition is a great motivator.
Uses:
- Off Season Training
- Tracking Runs.
- Tracking Hikes
- Tracking Steps
- Track elevation gained
- Monitor Resting & Active Heart Rates
- Approximate caloric burn (emphasis on emphasis – everyone’s metabolism is different)
- Measure distance
- Track sleep quality (important for recovery!)
Pros:
- Solid Analytics. An important tenet of the Hotshot Fitness Program is tracking your progress relative to your goals. The Charge HR helps with that. The dashboard can be accessed online and on your phone (android & iOS). The user interface is intuitive. Navigation is easy. Data is visualized in a way that is easily understandable.
- Good looks. Low Profile. It flies under the radar and doesn’t call attention to itself. It can be worn in an office, on a date, and at the gym. Great versatility.
- Heart rate tracking is surprisingly accurate. In my experience, this has been one of the most consistently dialed-in features.
- Fitbit Customer Service. After a year of using my Fitbit, the rubber wrist band began to separate on the corners where it connects with the watch face. After contacting the company about the issue, I was immediately shipped a refurbished Fitbit, same color, same model, free of charge. Minimal questions asked. My wife had a similar experience and she received the exact same customer service. Great customer service goes along way.
- Syncs with other devices in the Fitbit universe like the Fitbit Aria Wifi Scale.
Cons:
- Occasional Syncing issues. Though, over the last year, firmware updates have been made, and syncing has become much more reliable and faster.
- Mileage tracking. I feel that the Fitbit under-tracks my mileage. There’s a 4-mile out-and-back that I do regularly, and I KNOW it’s four miles. Google Maps says so. My car says so. But my Fitbit always records it as 2.98 or 2.99 miles. Which is a substantial delta. So I would not recommend you use the Fitbit for tracking distance, especially if using for back country navigation.
- Not completely waterproof. It will handle getting splashed (saying while you’re doing dishes or washing your hands) and can handle intense sweating no problem (can confirm, I sweat like a pig), but it can’t be submerged. There have been quite a few times when I hopped into the shower and then hopped right back out because I still had the Charge HR on my wrist. It would be nice to not have to worry about that.
- Display hard to read in direct sunlight. Especially during the middle of the day, when the sun is beating down, it is difficult to read the display. You’ll need to shade the display with your hand to read it. A minor issue, but it would be nice if future versions had brighter displays.
If you’d like to see more reviews on this item before you purchase, I would recommend you to visit https://inkdly.com/. You will find multiple reviews and hopefully be able to make a more informed decision before purchasing this FitBit!
Final Judgement:
Buy
Are you drinking enough water? If you look like this guy after a five mile run – probably not.
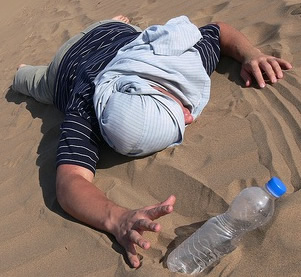 You’ve felt like a man stranded in the desert plenty of times before. Your mouth feels and tastes like a bottle of Gold Bond exploded in it. Your legs have morphed into inanimate stone pillars and continually cramp up, causing severe pain (you can find out what to do about leg cramps by following the link). Whenever you lick your lips, it tastes like the ocean. It’s all too obvious when we’re seriously dehydrated. But even mild dehydration can have serious implications.
Think about it: Have you hit a plateau in your training? Or some days, just feel like you’re out of it? There’s a chance that your declining performance could be related to your hydration – or lack thereof. If you’re dehydrated, your performance will suffer. It’s as simple as that.
In a study in the Journal of Applied Physiology, researchers found that dehydrated subjects performed substantially worse during exercises when compared to previous performances when they were well-hydrated.
In another paper titled “Rehydration and Recovery after Performance” by Ronald Maughan, Ph.D., John B. Leiper and Susan M. Shirreffs, the authors write:
“Dehydration and the associated problem of hyperthermia are two major factors that limit exercise capacity. In prolonged exercise, especially when the ambient temperature and humidity are high, a progressive dehydration seems to be almost inevitable because fluid intake usually fails to match sweat losses. The resulting loss of performance is accentuated if the athlete begins exercise in a state of hypohydration. Even in events of short duration, where there is little sweat loss, performance is impaired if the athlete is not fully hydrated at the start of exercise (Sawka & Pandolf, 1990).”
So, how much water should you be drinking?
Wildland firefighters need to be drinking at least 1 quart of fluid per hour during hard work (Domitrovitch & Sharkey, 2008). ONE QUART! If you’re hacking line for eight hours, you need to be consuming two gallons of fluid to compensate for all the fluid lost to sweat. They also recommend that between 1/3 and 1/2 of all fluid consumed during a shift should be a sports drink. But why a sports drink? Why not just regular water? Ever look at your yellow after an assignment? Notice how the straps of your line gear are neatly outlined in a white crust? That white crust is salt. Salt that once was in your body, doing good things. You need to get that salt (and other electrolytes like Potassium) back into your system.
Plain water is not the best beverage to be consumed following exercise to replace the water lost as sweat (Costill & Sparks, 1973; Gonzalez-Alonso et al, 1992; Nose et al, 1988); the replacement of electrolytes as well as water is essential for effective rehydration. Sodium is the major positively charged ion lost in sweat and is also the most abundant ion in the extracellular space. Dietary sodium is important in assisting effective rehydration, largely as a consequence of its role as the major ion of the extracellular fluid. If sufficient amounts of sodium and water are ingested, plasma osmolality and sodium concentration do not decline, as may occur if plain water is ingested. (Maughan, Leiper, Shirrefs, 1996)
And completely serious, the Federal Government has published a paper that recommends that you regularly examine your urine for signs of dehydration. It’s good advice – but it’s still funny 😉
[pullquote]
Firefighters should monitor their hydration status during an assignment by paying attention to: Urine color. Pale yellow or wheat color urine is normal. A lighter color is a sign of overhydration. Dark yellow or brown urine is a sign of dehydration. (Domitrovitch & Sharkey, 2008)[/pullquote]
Calculate Your Fluid Loss
So, you know you should be drinking more water, but how much do you need? And more importantly, how much are you even losing when you workout? Here’s a simple test that you can do to figure it out:
- Get naked. Get on the scale. Don’t have a scale? We got you covered. Digital scales like the Fitbit Aria Scale are awesome. They’re wifi connected, and sync with your Fitbit’s dashboard. Plus, a digital scale will provide weight to the tenth decimal place (e.g. 187.4) which will offer a more accurate measure. Plus, it’s not like trying to read a seismographic during an earthquake. Since there’s no needle, it doesn’t fluctuate with every involuntary muscle movement that you make.
- Write down your weight pre-workout.
- Work the hell out
- Get back on the scale. Naked.
- Subtract the the two numbers.
- The difference between the two = water loss.
If you lost one pound, then you would need to drink 16oz to compensate for that loss.
* Thanks to the Gatorade Sports Science Institute for this handy tool.
Advice for staying hydrated
Surround yourself with water. If you have a water bottle within reach at all times, the frequency that you drink is going to increase. This is why so many people decide to invest in Custom Water so they can have a large quantity of water at hand so they can always be hydrated. But this method isn’t for everyone. If you have to get up and walk over to the fridge to grab a bottled water, most of the time, you’re going to put it off till you’re thirsty enough to justify the 10 second walk. Pickup a good old-fashioned Nalgene bottle (preferably one that’s BPA-free) and keep it around the station. That way you don’t have to worry about trashing the environment by using bottled water.
Buy a CamelBak. Preferably two. One for the fireline, and one for personal use / training. They just make your life so much easier and convenient. Canteens are a pain to access on the go while you’re hiking and working. Ever try to stuff a canteen back into your line gear while you’re hiking? Frustrating. Ever try to screw on the bottle cap while you’re hiking and holding a tool? Very frustrating. Ever dropped a bottle cap into an ash pit and wondered, “Now what the hell am I going to do with this 3/4 full canteen with no top?” For all those reasons and a few more, camelbacks are definitely the way to go. CamelBak makes a hydration system specific to wildland firefighting called, aptly enough, “The Hotshot.” It’s designed to attach easily to most line gear systems.
If you’re using a CamelBak system, it’s imperative that you keep it clean. A microbial film will develop over time, and while it most likely won’t kill you, it’ll skunk up your water, and make each sip seem like you’re biting into a rotten lemon. Camelback offers a cleaning kit for thorough cleans. It’s a good idea to give your system a good cleaning a few times during the season. And it’s also a good idea to stow a few Camelbak Cleaning Tabs in your line gear for in-the-field cleaning.
Another good rule of thumb is to never put sports drinks like Gatorade or Powerade or any of those crazy powdered-concoctions you get in MREs into your line gear canteens or CamelBak. Inevitably, the sugars will foul up your bottles and bladders and that’s just an additional expense and headache you don’t need. Stash full-bottles of Gatorade in your line gear and dispose of them when you’re done. If you keep sports drinks in a powdered form in your line gear, use your camp cup to mix it up.
Start Drinking The Moment You Wake Up. Stash a Hydro Flask next to your sleeping bag. When you wake-up, before you even roll out of your sleeping bag, drink it. That way, before you even get out of bed you’re up a liter of water, and that’s a great way to fend off dehydration for the rest of your shift.
Also, water is great for your digestion. MREs carry a bad reputation for causing…”interruptions” in a firefighters’ bowel movements, but one of the biggest causes of constipation is dehydration. Crass as it might be, you need to keep the pipes lubricated. Staying hydrated will help keep your digestive system moving along, and that’s key.
References
 By Anthony Harrell
It’s late-August and fire season is flowing like water over the falls! Long gone are the days of wondering if you busted your ass hard enough over the winter to make the dreaded crew hike up Hell’s PT Trail. You are starting to get in a rhythm with the season: Hit a roll, R&R, maybe kick rocks around your local unit’s home base, and get ready to roll again (don’t worry, California’s “fire season” is on the horizon”). PT now is mostly about maintenance and staying at the ready for the next fire.
With such a brutal job description, it is no wonder that wildland firefighting has been categorized as a “young man’s game.” Too often, firefighters like you push your physical limits on a roll, willfully overlooking, or straight-up ignoring, bumps, bruises, aches and pains. You just hope that if you can make it to your day-off you’ll be fine. But let’s be honest – that attitude puts you at risk for a future filled with chronic injuries, or even worse, a career cut short. So to help you increase the longevity of your career, this article will walk you through some ways you can treat common fireline ailments cheaply and effectively at home or on the line.
Dealing With the Pain
Back and lower extremity injuries make up ~25% of reported fireline injuries, however, this statistic can not possibly capture everyone with true injury or dysfunction. The drive to cash in on every opportunity for overtime and hazard pay is enough to drive a lot of folks to fill their line gear with enough Vitamin I (aka Ibuprofen) to kill a moose. Anything to help them push through pain. The problem with this method is that it is similar to putting a fire to bed without sending anyone in for the mop-up operation afterwards. It leaves your musculoskeletal system vulnerable to another flare up without truly addressing the issue.
Just because we have pain does not necessitate injury. Pain is our body’s way of letting us know that we are utilizing dysfunctional mechanics that are wearing down our system. Self-myofascial release techniques (sounds NSFW, but trust us, it checks out) are one way to address the soft tissues (muscles) within our movement system that often times become short, tight, and overused.
[pullquote align=left]
Science Lesson:
myo = muscle
fascia = tissues overlying the muscle
[/pullquote]These techniques simply include using an external object (i.e. foam rollers, lacrosse balls, etc.) to bring back tissue mobility and health by freeing up the gunk and crud that our muscles accumulate over time. One recent study has shown that foam rolling reduced fatigue in athletic populations which translates into longer and more efficient work time and gives the psychological advantage of feeling healthier. Spending time on the foam roller is thereby a performance booster and a modality which can easily be done at home.
A less common (but just as effective) way to self-massage can be done with a lacrosse ball. If those knots in your back are extremely sensitive then you might consider starting out with a tennis ball for these mobility tricks. If you are up to really getting into those tight corners and are willing to endure the discomfort, go to your local sporting goods store or check online for a lacrosse ball. All you need after that is some floor space and the willingness to do something besides drink beer and pop Advil to melt away all that tightness in your back that has been building up since May. Some people who have recurring back pain find these practices can help somewhat but they don’t do a great deal, there are alternatives for people who suffer from chronic pain such as this, what they can do for themselves is use medical marijuana, such as the death bubba weed strain. With medical marijuana, it may help ease symptoms of pain and relax the muscles in the body, depending on where you are in the country you can apply for a medical marijuana card, if you were in Ohio you would search “how to get a medical card in ohio” to check your eligibility, you can then talk with your doctor about the best route possible to take to help you with your pain so you aren’t suffering as frequently as you are. There are other forms that this medication can take too; Click here for more information.
Upper Back
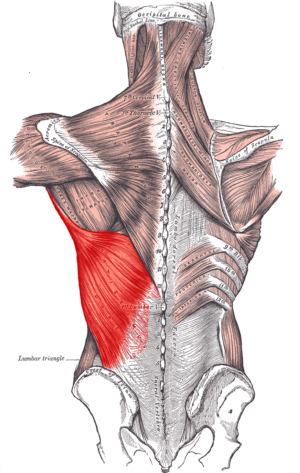 Rucking a 45 pound pack with a tool up and down a mountain is tough. Compound this with the fact that you are running a chainsaw tank-for-tank with your partner and it’s no wonder your back is tighter than a snare drum. There are nearly 20 muscles that attach to the shoulder blade, but breaking everything down into only two movements can handle most of them.
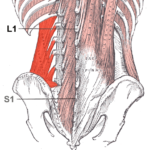
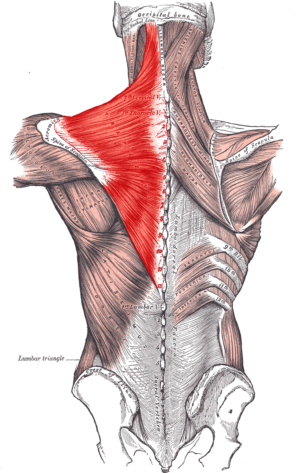
Even though line gear packs are designed to distribute weight primarily through the hips, the straps that overlay the shoulders must distribute some of the forces through the shoulders. Swinging a tool and wearing line gear is the perfect combination to cause shoulder pain, tightness, and scapular/ “shoulder blade” dysfunction. Glancing at the Wikipedia artwork, you will notice the muscles in red as the trapezius muscle on the left and the lats in the picture on the right. This muscle tune-up trick can be done quick and easy by placing a lacrosse ball on any tender or tight spots in the general areas of these muscles and lying down on a firm surface. After you have rested your back on top of the ball, you can use arm movement on the same side to really dig into those areas that need attention.
The Movement:
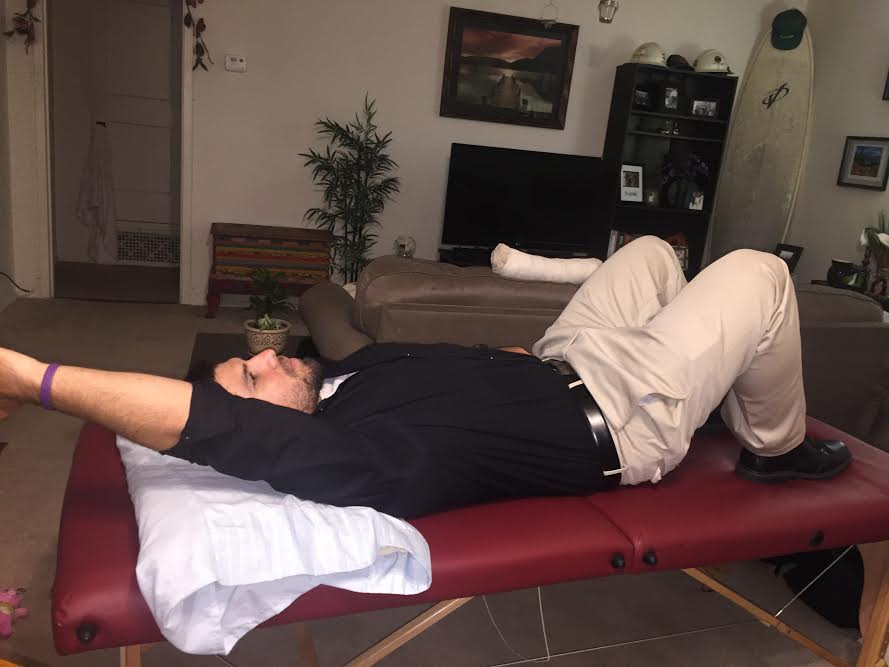
- Perform a slow reach overhead focusing on the painful muscle.
- Pause for a second or two at your highest point and slowly lower back towards the ground.
- Repeat this multiple times over the course of about 30 seconds and then roll off the ball and allow yourself 30 seconds to recuperate. You can repeat this same sequence one to two more times each session.
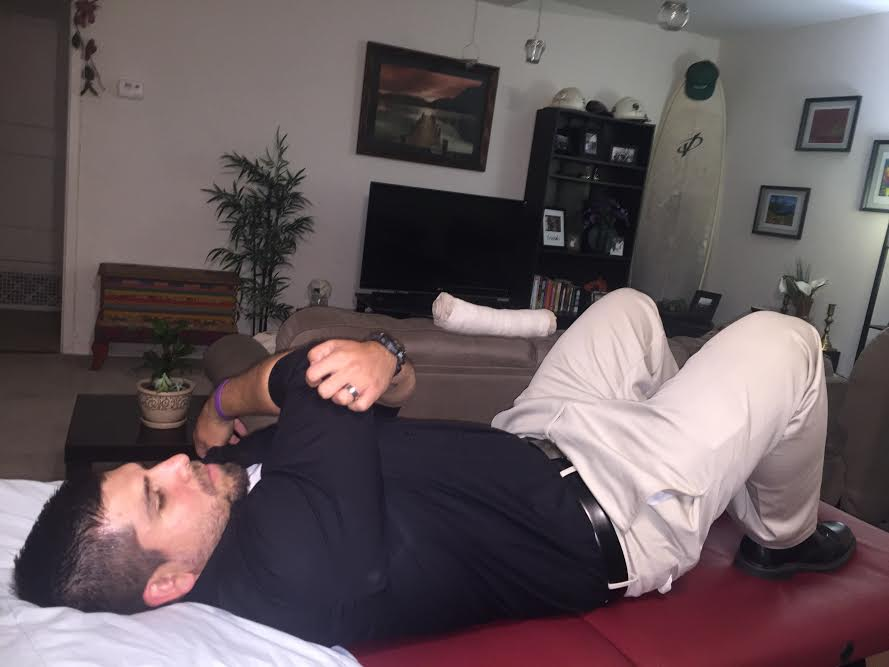
Though the overhead movement is generally effective for the majority of the upper back, you may find that the across body reach/stretch (as seen below) is able to deliver deeper, more targeted, relief when you have tight spots between the shoulder blades.
The Movement:
- Repeat the process of lying with your back down on the ball
- Literally – give yourself a hug! Reach across your body and hold for 5 to 10 seconds. You can use the opposite arm if needed to hold yourself in this position so you don’t accidentally roll off the ball.
- Relax and repeat this movement over the course of 30 seconds to a full minute. Give yourself 30 seconds to relax and then repeat the sequence one or two more times.
Lower Back and Hips
It’s almost a given that most people will experience some level of low back pain in their lifetime. As a firefighter, you are at a greater risk having to bend forward to cut line, pull hose, run a chainsaw, and muscle around a pack for 16 hours. Here we have put together a trick for addressing low back tightness which should help you keep pounding away at the job you love.
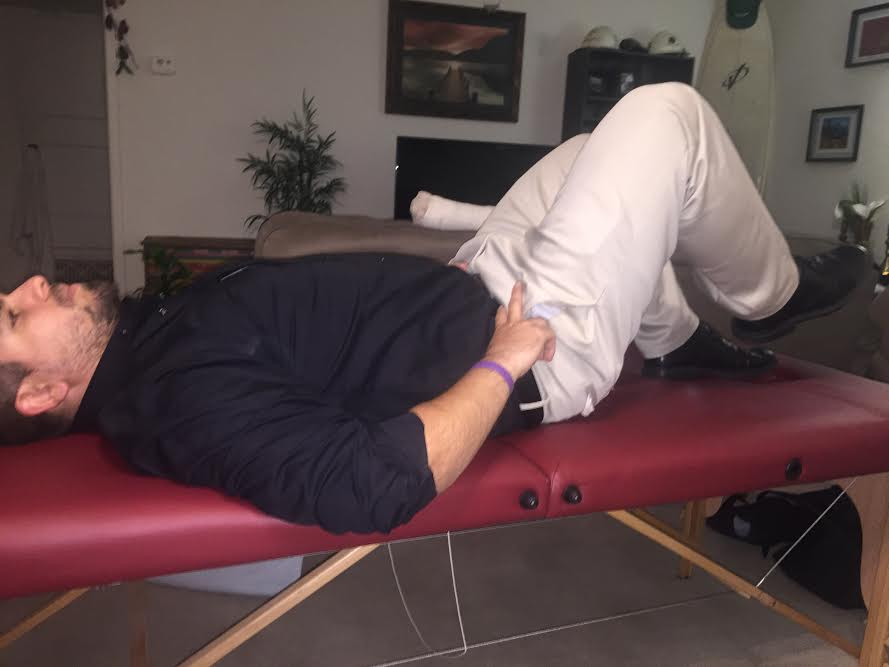
There are numerous muscles that make up your low back. When these muscles are working on overdrive they hypertrophy and become tender to pressure. The next movement can address these sore spots by utilizing leg movements instead of the arms. It may take some playing around on your part to find which spots can benefit the most, but the sequence is generally the same.
The Movement:
- After placing the ball against the tight or tender position, perform a single leg march with the leg that is on the same side of the ball. In the picture above, I only raise my leg partially which may be better for those of you who need to start slowly. If you want some deeper work done, bring your knee up even closer to the shoulder.
- Return the foot to rest on the ground before repeating the movement for repetitions over the course of 30 seconds. Rest 30 seconds and repeat.
Don’t Forget – Listen to Your Body
Becoming self-aware and in tune with your body also means that it is important to not simply push through any abnormal sensations that could arise.
- If you get any numbness or tingling anywhere, give yourself a short break to make sure it goes away. If it continues – stop the exercise! This is a sign of possible nerve or vascular compression and you should never push through this.
- You should expect to be sore immediately after doing these exercises. If the soreness leads to increased pain that lasts more than 24-48 hours, then stop! You can try some gentle stretching or less invasive self-massage techniques with a foam roller.
- Try to keep the ball to bigger muscle areas (e.g. back, legs, etc.) that need your attention. You should never roll out any superficial areas where nerves and blood vessels can be disrupted.
If none of these movements are working for you, it may be time to try some methods suggested by medical professionals. One of these is chiropracty, which you can access at chiropractor Doncaster, and is supposed to realign your back for successful pain relief. Other methods may be suggesed depending on the situation.
Closing Thoughts
It is my goal to empower all of you to try out self-maintenance and be more aware about taking care of your body. The fire season is a long and grueling beast, but you also want to be able to enjoy your family, go skiing or surfing all winter, and return to battle the flames again the following season. To accomplish this, you need to take care of those nagging injuries now, and if it is something that isn’t getting better then go see a licensed medical professional.
ABOUT THE AUTHOR:
Anthony Harrell spent three years with the Ukonom Hotshots. His adventures in fire inspired him to pursue a career in Physical Therapy, and he recently graduated from the Doctor of Physical Therapy program at the University of California, San Francisco (UCSF) / San Francisco State University.
He lives in the San Francisco Bay Area. He has been a contributor to Hotshot Fitness since 2016. He can be reached at anthony [ at ] hotshotfitness.com
Interested in writing for us? Check out our contributor guidelines for more information.
Just wanted to share an opportunity with the HF Community. I was contacted by Jen Maxwell, who’s handling casting for an advertising campaign for Isopure. They’re looking to feature wildland firefighters in an upcoming ad campaign. Interested? Details below.
Note: The deadline to apply is 5pm August 8 – it’s coming up quick!
——————————
